
Overview
The Self-Service Kiosk turns a tablet or kiosk device in your lobby into an unattended arrival station. A guest who arrives without completing online check-in can identify their reservation on the device, complete the check-in steps you allow, and receive a room key without help from the front desk.
The kiosk is a dedicated, kiosk-native journey rather than a copy of the mobile online check-in experience. It boots to a reservation-less Welcome screen, runs the online check-in flow in kiosk mode with lobby controls of its own, and ends on a completion screen that resets itself for the next guest. You control the copy on the key screens, which check-in steps appear on the device, whether a room key is issued at the end, and whether the reservation status is pushed back to your PMS.
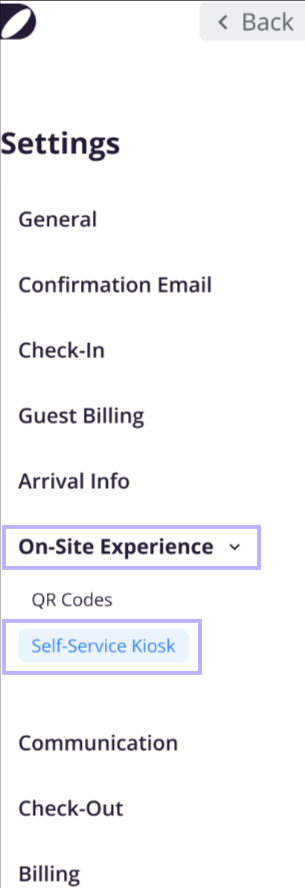
Kiosk settings live in a settings area called On-Site Experience, which holds two pages:
- QR Codes (this is the page previously called Digital Spots, renamed and moved here)
- Self-Service Kiosk
Applies to
|
Pricing
The kiosk experience itself is available to all accounts and is not sold as a software add-on. What can carry a cost is the hardware side: the kiosk or tablet you install, and the key provider integration that releases room keys, which is a paid key dispenser add-on. Your Duve contact or Customer Success Manager can confirm what applies to your property.
Use cases
- Unattended arrivals: A guest who skipped online check-in completes the whole arrival flow at the kiosk and walks to their room.
- Reduced front-desk dependency: Properties with limited or no reception staffing can still offer a full arrival experience.
- Peak arrival times: The kiosk absorbs arrival volume so staff can focus on guests who need real help.
- Physical key issuance: A guest receives an encoded key card at the end of check-in through your key provider integration.
- Lost or additional keys: A guest replaces a lost key or prints an extra key without approaching reception.
- Privacy-safe ID capture: Instead of scanning a passport on a shared lobby screen, the kiosk hands the document step off to the guest's own phone by QR code and waits for the upload.
- Multi-language lobbies: The guest picks their language on the device, from the languages you already offer, and every screen follows.
- Several kiosks in one lobby: Each device gets its own link, bound to the encoder next to it, so a key always prints on the machine the guest is standing at.
- Brands with their own arrival experience: A brand can override the account’s kiosk messages and services and keep its own device links.
- Staff-assisted check-in: The same boot screen also serves the Staff-Assisted (Control Device) experience, so staff can drive an arrival from a front desk device.
Before you start
- Nothing has to be enabled to reach the settings. Go to Settings > On-Site Experience > Self-Service Kiosk. If you had bookmarked the old Digital Spots tab, that link now opens On-Site Experience > QR Codes.
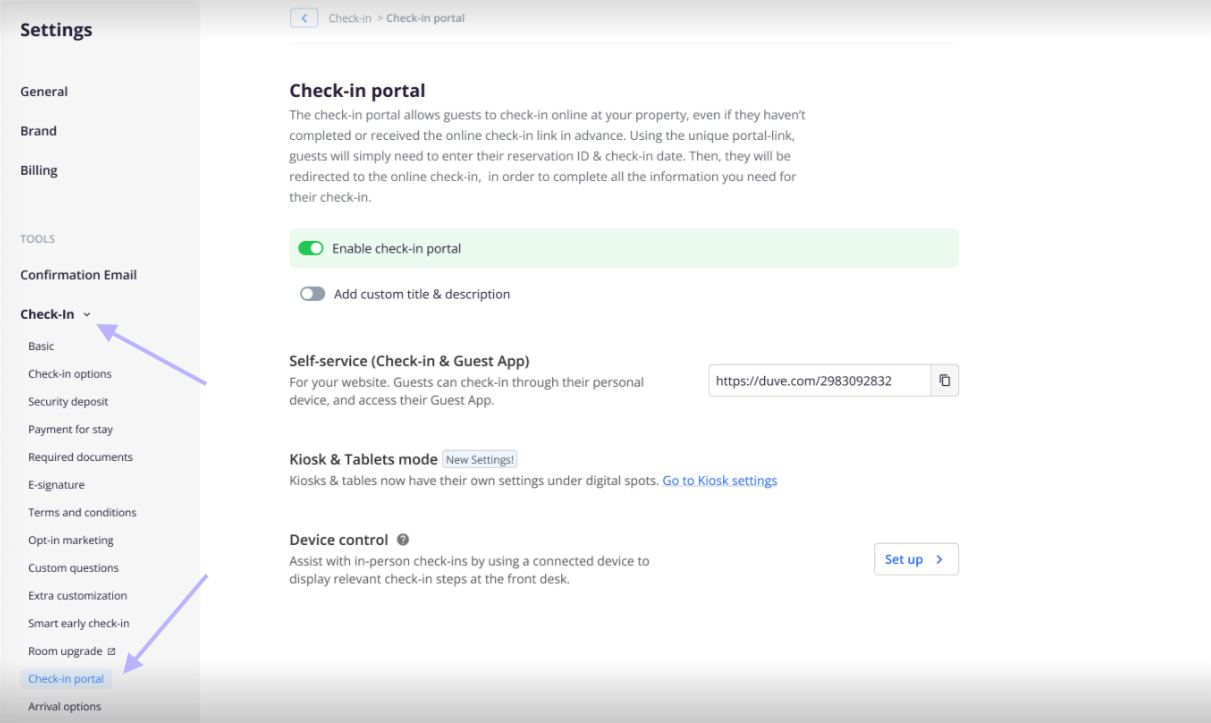
- Confirm the Check-In Portal is enabled under Settings > Check-In > Check-In Portal. The kiosk link is built on your check-in portal, and a Kiosk mode row with a link to the kiosk settings appears on that page once the portal is on.
- Enable, at the online check-in level, any step you want to offer on the kiosk. Kiosk capabilities inherit the rules from your Online Check-In settings, so a step that is off there cannot be switched on for the kiosk:
- ID verification depends on document scanning being enabled under Settings > Check-In > Required Documents.
- Payments depend on guest billing and payment for stay being enabled for your account.
- To release room keys, connect the SALTO NCoder integration first, including the encoder details it asks for. The Room Key Release toggle stays disabled until a supported provider is connected.
- Review the guest languages you allow. The kiosk language selector offers exactly the languages enabled for your guests.
- Prepare the hardware: the kiosk or tablet itself and, for physical keys, the supported encoder. Duve does not detect or verify your hardware, so the settings page warns you to make sure the device supports the services you switch on.
- If the property has more than one encoder, note which encoder each kiosk will stand next to. Duve generates one device link per encoder, and opening the wrong link on a device prints its keys on the wrong machine.
- The kiosk runs from a dedicated Device Access Link that you open on the device. The link puts the device into kiosk mode, so keep it to the devices you install: anyone opening it gets the kiosk experience rather than the standard login page.
How to set it up
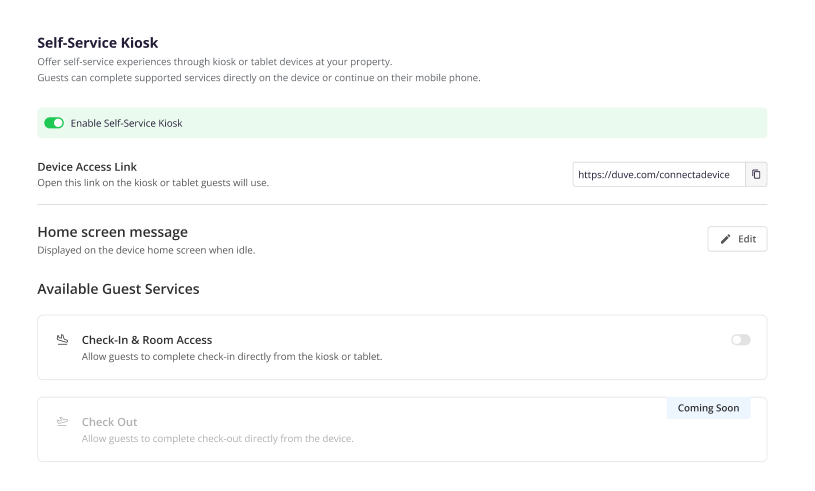
Go to Settings > On-Site Experience > Self-Service Kiosk. The page holds the Device Access Link, the Home screen message, and the Kiosk Services cards.
1. Open the kiosk on your device
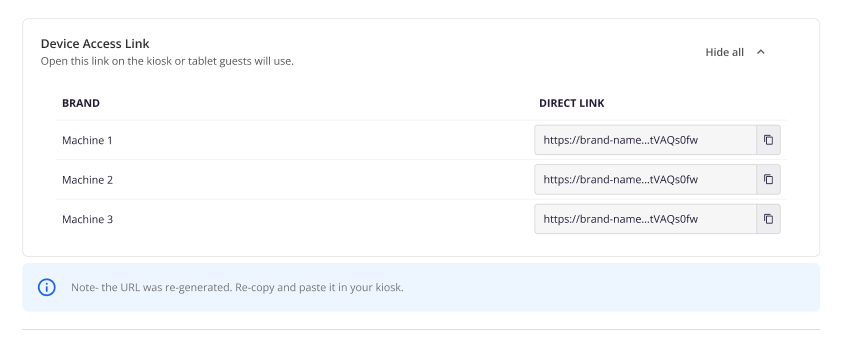
In Device Access Link, copy the generated URL and open it on the kiosk or tablet the guests will use. This is your check-in portal link, marked as a kiosk session, so the device boots straight into the kiosk Welcome screen instead of the standard login page.
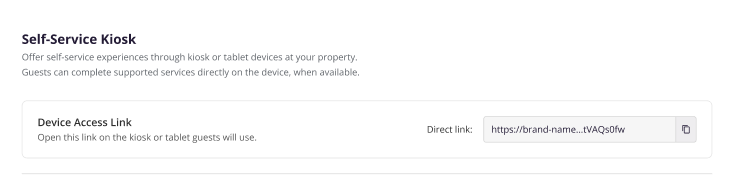
What you see in this card depends on your key hardware:
- One encoder, or none configured yet: a single Direct link, the same one the page has always shown.
- Several encoders: a Show all control that opens a Device and Direct link table, listing one link per encoder controller. Copy each row to the device standing next to that encoder.
Each kiosk has its own dedicated URL - make sure to open each link on its corresponding device.
2. Set the home screen message
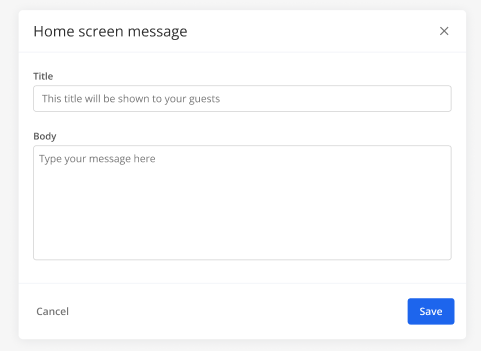
Next to Home screen message, click Edit. The editor holds a Title and a Body, both shown on the device home screen while it is idle. Use the translation strip at the top of the editor to switch languages or to translate your text into all of your active guest languages at once. If you leave the fields empty, Duve shows suggested default copy in the guest's own language.

3. Choose the kiosk capabilities
Under Kiosk Services, open the Check-In & Room Access card.

The service itself is always on, since it is the only kiosk service available today. Under Available Capabilities, choose which steps run on the device:
- ID verification: Switches the document step on. On the kiosk, this step is a QR handoff: the device displays a QR code, the guest scans it and uploads their document to their own phone, and the kiosk polls until the upload arrives. Turning this off also removes the face verification step from the kiosk flow.
- Payments: Switches the pay-for-stay step on.
- Guest arrival time: Off by default, since the guest is already at the property. With the page hidden, Duve records the arrival time frame itself: the current hour in the property's time zone, never earlier than your minimum check-in time.
- Guest arrival method: Off by default. With the page hidden, no arrival method is recorded, because the guest never chose one.
- Room key release: See the next step.
- Other check-in steps (basic details, E-Signature) will be active automatically, and as long as they are Mandatory, the guest will have to complete them
- Transportation is the exception: the airport and taxi offer steps are always skipped on the kiosk, with no toggle, because a guest already standing in the lobby has no inbound ride to book.
Setup note: A capability whose underlying online check-in service is off appears off and cannot be switched on. ID verification shows an inline hint with a link straight to your Check-In settings when document scanning is not enabled. A capability locked this way keeps the value you saved, so switching the online check-in service back on restores it on the kiosk too.
4. Turn on Room Key Release - currently supports SALTO NCoder only
Switch on Room Key Release to issue a room key at the end of kiosk check-in. The toggle is disabled until a supported key provider is connected, and shows the hint "To use key release, first connect a supported key provider" with a link to your Connection settings. Two more fields appear underneath:
- Key provider: Choose your encoder integration. SALTO NCoder is the only eligible option. Clearing it also switches Room Key Release back off.
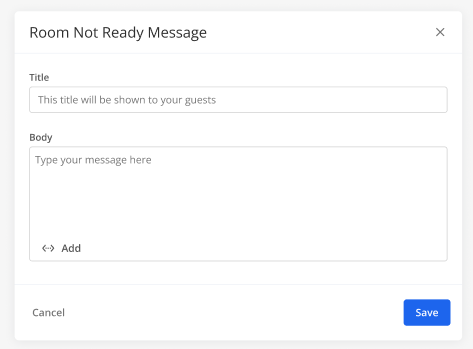
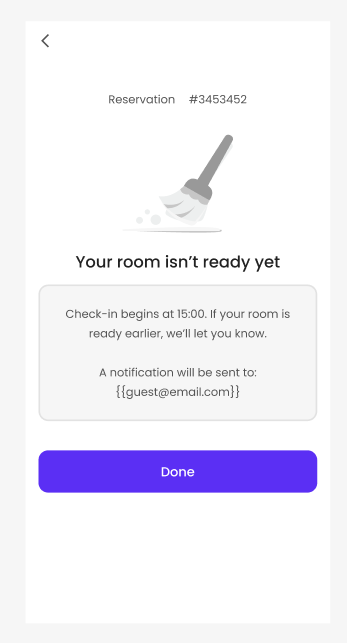
- Room Not Ready Message: Click Edit to rewrite the title and body a guest sees when their room is not ready yet. This editor supports the translation strip and an Add button for dynamic data, so you can pull values such as the earliest check-in time into your text. The suggested default body already does this, reading "Check-in begins at" followed by your minimum check-in time.
Setup note: Duve does not check that the encoder is actually reachable, only that a provider is connected, so test the flow end to end on the real device before you go live.

5. Set the completion behavior
Still on the Check-In & Room Access card:
- Completion Message: Click Edit to rewrite the title and body of the final kiosk screen. This editor also supports translations and dynamic data.
- Update reservation status in PMS after check-in: Switch this on to push the status back to your PMS when a guest completes check-in on the kiosk, then pick the status to update to in Update status to.
- The Update status to list holds the statuses your connected PMS actually accepts. Turning the toggle on selects the first accepted status for you, so the setting can never be on with nothing to send. If none of your connected PMSs accept a status update, the whole row is hidden.

Troubleshooting note: If there is a block in the PMS to change status to a non-clean room, Duve will be blocked as well from changing the status. The settings page carries the same warning inline, with a More info link: status updates can also be blocked when no room is assigned yet.
6. Check Out
The Check Out card is visible but disabled, with a Coming Soon label. Nothing to configure there yet.

7. Optional: override the kiosk for a brand
Open the brand’s settings, go to the Self-Service Kiosk page, and switch on Override options. Until you do, the brand runs on the account’s kiosk settings, and the fields stay hidden.
- A brand overriding for the first time starts from the standard defaults, not from a copy of the account’s configuration, so its messages and key release are yours to set.
- Switching the override off and on again keeps the edits the brand already had.
- Messages are stored and translated per brand.
-
Key hardware stays account-level: the provider you connect serves every brand.
Guest experience
Here is the whole journey as a guest meets it, from an idle device to a room key:
- The device sits on the Welcome screen with your message, and the guest taps Start Check-In.
- The guest identifies their reservation, or scans the QR code to continue on their own phone.
- The guest moves through the check-in steps you allow, with the document step handed off to their phone.
- The guest reaches the completion screen, collects a key when key printing is on, and the device resets itself for the next arrival.
Troubleshooting note: Each of those stages is described below, along with what happens when a guest walks away or needs a replacement key.
Welcome screen
The device opens on a reservation-less Welcome screen showing your logo, your home screen title and body, and your cover image below the text. It offers:
- Start Check-In, which reveals the login form.
- Lost your key? Shown only when key printing is enabled. It also leads to the login form, since the reservation has to be identified first.
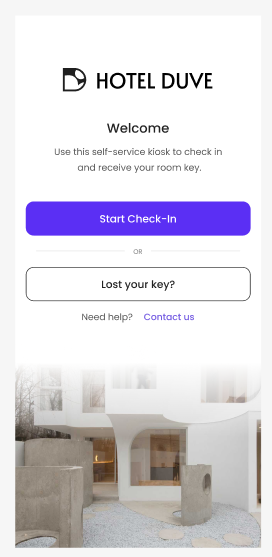
- Need help? With a Contact us link, which opens a popup showing your property phone number and email as plain text.
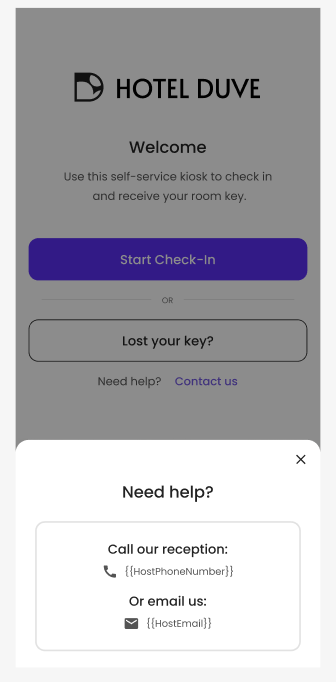
- A language selector in the top corner, offering the guest languages you allow.
Login and identification
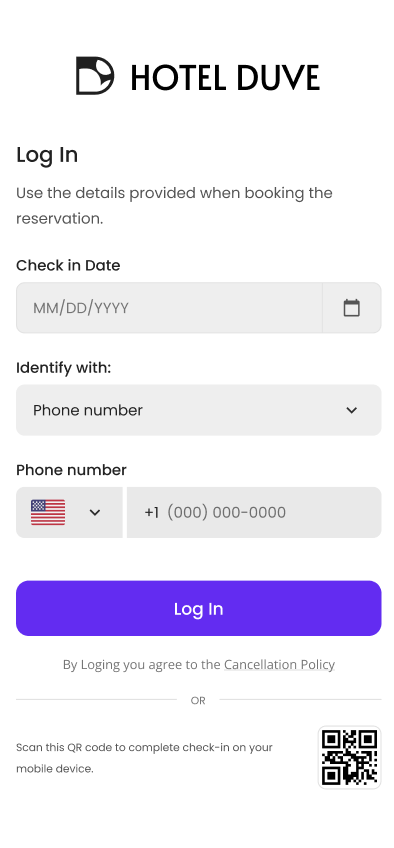
The guest identifies their reservation with the login methods you already allow on your check-in portal. Two things differ from the standard portal:
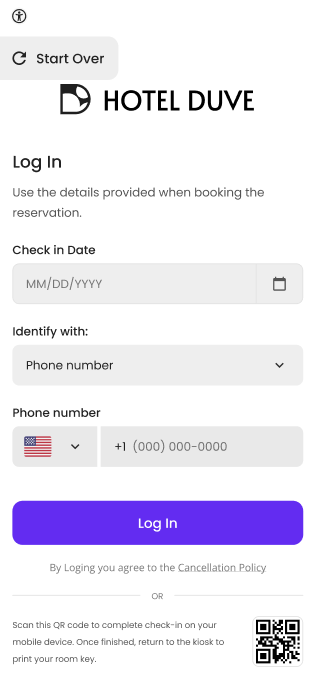
- The header carries a Start over control instead of the accessibility icon, so a guest or a staff member can reset the device at any point.
- Below the form, a short note tells the guest they can finish on their own phone instead, next to a QR code. The wording changes with your setup: when key printing is on, it tells the guest to come back to the kiosk afterward to collect the key. The QR code points to the same reservation's mobile flow, so the guest keeps their language and session and simply drops the kiosk marker.
Check-in steps
The guest then moves through your online check-in pages in kiosk mode. Steps you excluded are skipped in both directions, and a guest who resumes on a hidden step is moved past it rather than shown it. Steps are skipped even when your online check-in settings mark them as mandatory. The transportation offer steps are always skipped here, whatever your online check-in settings say.
Every wizard step in a kiosk session also carries the lobby controls: a Start over line above the step, and the inactivity watcher described below.
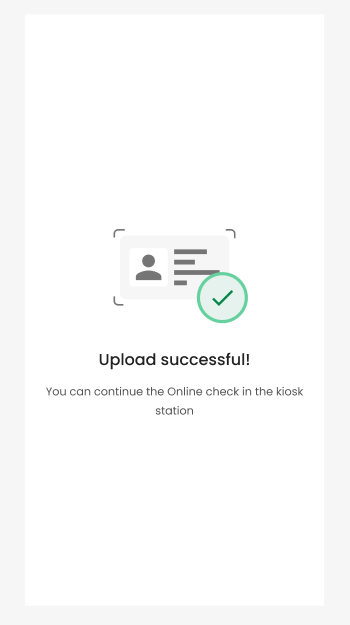
The document step, when enabled, is the QR handoff: the kiosk shows the QR, and once the phone finishes the upload, the kiosk confirms that the documents were received and continues on its own.
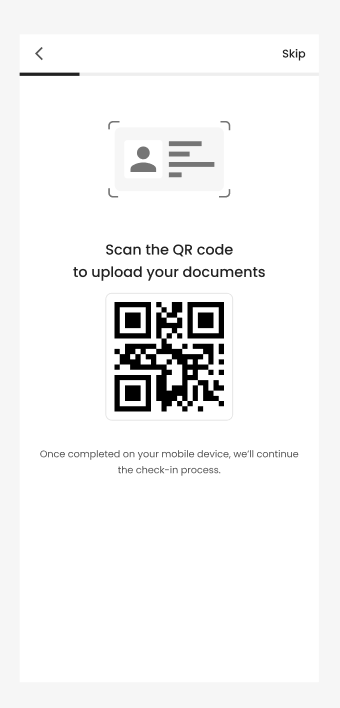
On the phone side, the guest sees a confirmation telling them to return to the kiosk rather than continuing the mobile flow.
If a guest walks away
An unattended kiosk cleans up after itself. After 60 seconds without interaction, an "Are you still here?" prompt appears with a Continue button and a Cancel and Start over link. If nobody responds, the kiosk resets after a further 30 seconds: the guest session is signed out, and the device returns to the Welcome screen, ready for the next arrival.
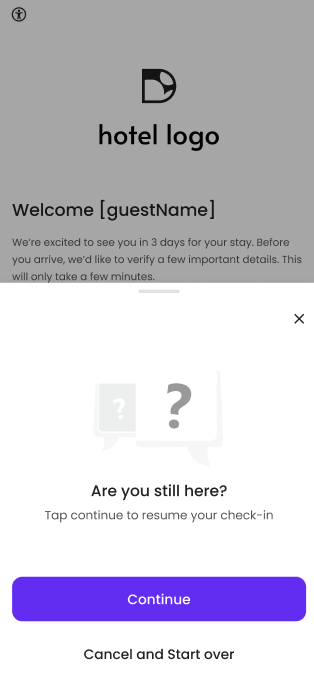
Troubleshooting note: These controls belong to the unattended kiosk only. A Staff-Assisted (Control Device) session has a host to clear an abandoned check-in, so it gets neither the Start over control nor the inactivity prompt. A control device also skips the rest of the kiosk behavior: the page rules above, the document-scan handoff and the key screens are all kiosk-only.
Room access and completion
Once check-in is complete, the reservation status is updated according to your settings and the guest lands on one of these endings:
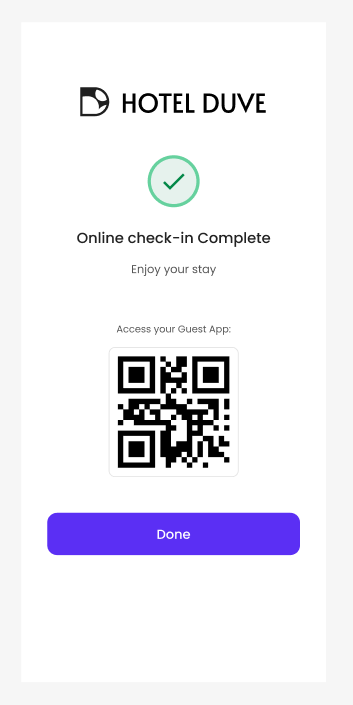
- Key release off: The completion screen shows your completion message, a QR code that opens the Guest App on the guest's phone, and a Done button that counts down from 30 seconds. The kiosk returns to the Welcome screen when the guest taps Done or when the countdown reaches zero.
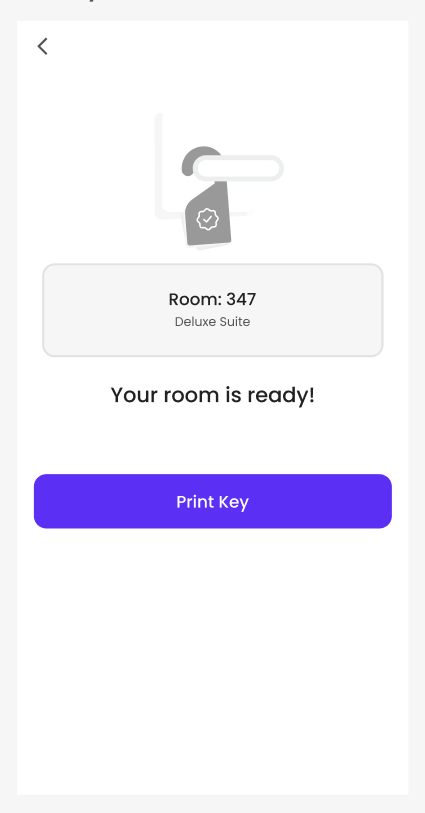
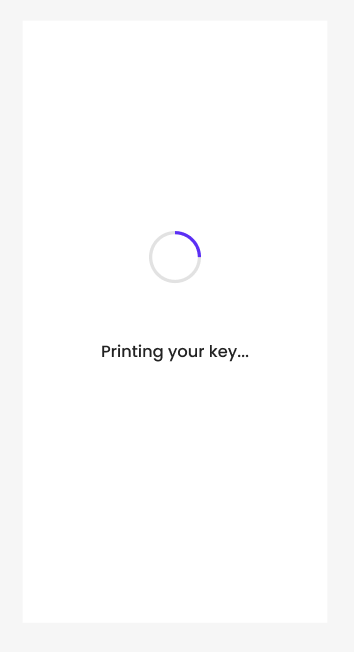
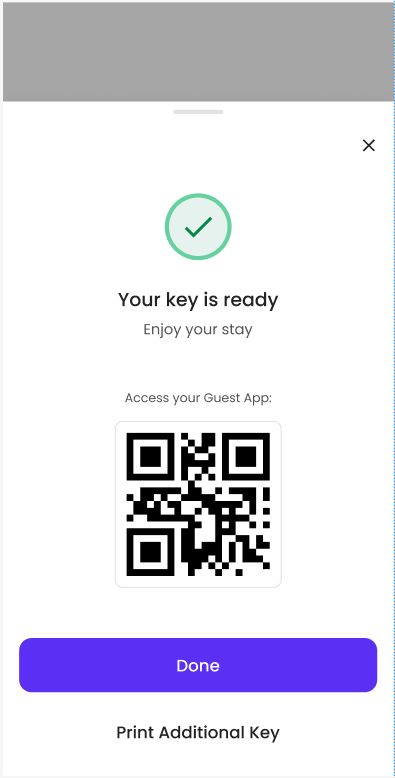
- Key release on and the reservation is checked in: A Print Key screen shows the room details and a Print Key button. Tapping it shows a printing loader, then a popup saying the key is ready, with the Guest App QR code, the same 30-second Done countdown, and a Print additional key link. The key is encoded on the encoder bound to that device.
- Key release on and the reservation is not checked in yet: A Room Not Ready screen shows the reservation number, your room not ready title and body, and a Done button that returns the device to the Welcome screen. This is the screen a guest sees when the room is not ready, because a PMS holds the reservation short of checked-in until the room is released.
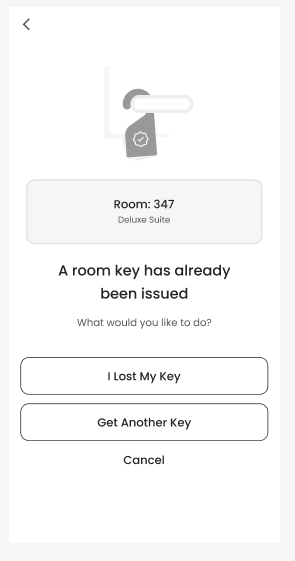
- Key release on and a key was already issued for the room: The guest goes to the Key Management screen instead.
Lost or replacement keys
The Key Management screen opens when a key has already been issued for the reservation, either after check-in or when the guest starts from Lost your key?. It offers:
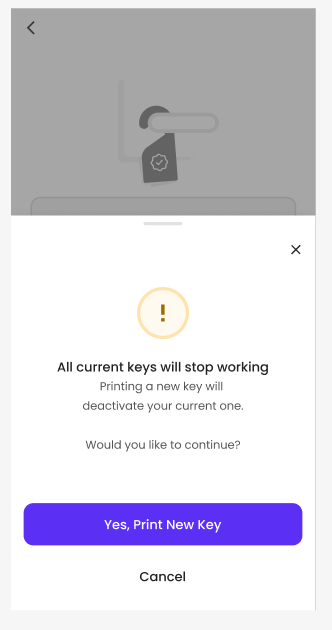
- I lost my key: A confirmation sheet warns that the current keys will be deactivated. On confirmation, the previous keys are invalidated, and a fresh key is printed.
- Get another key: Prints one more key for the same room.
- Cancel: Which returns the device to the Welcome screen.
Troubleshooting
- I cannot find the Self-Service Kiosk page: It lives under Settings > On-Site Experience. Old Digital Spots links still work and land on On-Site Experience > QR Codes.
- A brand’s kiosk fields are hidden: The brand is inheriting the account’s kiosk settings. Switch on Override options on the brand’s Self-Service Kiosk page to edit them.
- The kiosk link opens the normal login form instead of the Welcome screen: The kiosk check-in service was explicitly turned off for the company, or the link is a Staff-Assisted control device link rather than a kiosk device link. Copy the link again from the Device Access Link card.
- A capability toggle is off and cannot be switched on: The underlying online check-in service is off. For ID verification, enable document scanning under Settings > Check-In > Required Documents. For Payments, enable payment for stay in your guest billing settings.
- The key printed on the wrong encoder: The device is open on another encoder’s link. Copy the row for the encoder standing next to that device from the Device Access Link table and reopen it there.
- The guest cannot finish at the kiosk: Point them to the QR code on the login screen so they can finish on their phone, then return to the kiosk to collect the key. Staff can also take over at the front desk.
- The device went back to the Welcome screen on its own: Either the completion or key-ready countdown finished, or the inactivity prompt timed out. Both are expected. The guest can log in again, and the flow picks up from the right screen.
- The device is stuck on a guest's session: Use Start over in the header or above the step. It signs the guest out and reloads the device on the Welcome screen.
- A guest cannot find their language: The selector only offers the guest languages enabled for your account. Add the language in your language settings.
- A guest sees Room Not Ready when you expect the room to be ready: The kiosk offers Print Key only once the reservation is checked in on the PMS side, because the encoder refuses to cut a key before that. Check the reservation status and the room status rules that gate it in your PMS.
- The reservation status did not update in the PMS after a kiosk check-in: Some PMS configurations refuse a check-in status change while the room is not clean. Duve cannot override that rule, so when your PMS blocks the change, the status stays as it was. The kiosk check-in itself still completes, and staff can set the status once the room is ready. If this happens often, review the status rules on the PMS side with your PMS provider.
Restrictions and limitations
- The kiosk is available on every account, but Check-In & Room Access is the only kiosk service today.
- Kiosk settings are set at company level, with an optional per-brand override. There is no per-property or per-device configuration beyond the encoder each device link is bound to.
- Kiosk capabilities inherit the rules from your Online Check-In settings. A step that is disabled there cannot be enabled for the kiosk.
- A step you exclude from the kiosk is skipped even when your online check-in settings mark it as mandatory. Guests can complete kiosk check-in without it.
- Only ID verification, Payments, Guest arrival time, Guest arrival method, and Room Key Release can be toggled for the kiosk specifically. Other pages follow your online check-in configuration, except the transportation offer steps, which the kiosk always skips
- Turning ID verification off also removes the face verification step from the kiosk flow.
- ID documents are not captured on the kiosk device itself. The step always hands off to the guest's phone by QR code.
- The Kiosk can be activated without any Key dispenser connection.
- Room key release requires an eligible key provider integration. SALTO NCoder is the only eligible provider today, and the toggle stays disabled until it is connected.
- Duve verifies that a provider is connected, not that the encoder is reachable, so a key print can still fail on hardware that is offline.
- A key prints on the encoder bound to the device link the guest is using. A device opened on an unbound link falls back to the property’s only encoder, which is why multi-encoder properties must use the per-device links.
- Key Management appears only when at least one key was already issued for the reservation.
- Replacing a lost key deactivates the previously issued keys for that reservation.
- Print Key is offered only for a reservation the PMS reports as checked in. Any other status sends the guest to Room Not Ready.
- Update status to offers only the statuses your connected PMS accepts, and the row is hidden when no connected PMS accepts one.
- The unattended lobby controls (Start over, inactivity prompt) do not apply to the Staff-Assisted (Control Device) experience, which shares the same boot screen but is staff-operated and opens the guest journey in a separate tab.
Tips and tricks
- Keep kiosk copy short and action-oriented. Guests read it standing up, often with people waiting behind them.
- Use the translate-all option in the translation strip on all three message editors so the home, room not ready, and completion screens are covered in every guest language you support.
- Write the room not ready message with a clear next step, and use the dynamic data Add button to pull in the earliest check-in time instead of hardcoding an hour.
- Leave Guest arrival time and Guest arrival method off unless you have a real operational reason to ask. The guest is already standing in your lobby, and the arrival time frame is recorded for you.
- Turn on the PMS status update so the front desk can trust that a kiosk arrival is reflected in the PMS.
- Label each kiosk with the encoder it is bound to, and keep a note of which device link went where. It is the quickest way to explain a key that printed across the lobby.
- If your PMS only checks a reservation in once the room is released, brief the front desk that Room Not Ready at the kiosk usually means exactly that.
- Test the whole flow on the real device before going live, including a failed key print, a room that is not ready, and walking away to watch the inactivity reset.
- Place the kiosk within sight of a staff member for the first weeks, so someone can step in and learn where guests hesitate.
FAQs
Q: Do guests have to complete online check-in before arriving?
A: No. The kiosk is built for guests who arrive without checking in online. A guest who already completed check-in can still use the kiosk to collect a key.
Q: Do I need to switch the kiosk on somewhere?
A: No. The kiosk settings page is available on every account, and Check-In & Room Access is always on because it is the only kiosk service today. You control what the kiosk does through the capability toggles.
Q: Where does the kiosk link come from?
A: It opens the kiosk experience, so treat the link as operational hardware configuration rather than something to share with guests. The QR code on the kiosk login screen is the link to give a guest who wants to continue on their phone.
Q: What happens if someone opens the kiosk link on a phone or a random browser?
A: On an entitled account, it opens the same kiosk experience, so treat the link as an operational device link. On an account without the kiosk feature, the link falls back to the standard check-in portal login form, and the kiosk marker is dropped from the check-in flow as well.
Q: Can guests switch from the kiosk to their own phone?
A: Yes. The kiosk login screen shows a QR code that continues the same reservation on the phone. When key printing is enabled, the note tells the guest to return to the kiosk afterward for the key.
Q: Can guests change the language on the device?
A: Yes. A language selector sits on the Welcome screen and on the login screen, offering the guest the languages you allow.
Q: What happens if a guest walks away mid-check-in?
A: After 60 seconds of inactivity, the kiosk asks "Are you still here?". If nobody responds within the following 30 seconds, it signs the session out and returns to the Welcome screen. Staff can also reset the device at any time with Start over.
Q: Why does the ID step show a QR code instead of scanning on the kiosk?
A: The document step is deliberately handed off to the guest's own phone, so identity documents are not captured on a shared lobby screen. The kiosk waits, confirms that the documents were received, and continues by itself.
Q: Which key providers are supported?
A: SALTO NCoder only at this time.
Q: I have two encoders. Which link do I open on which device?
A: Open the link whose Device row names the encoder standing next to that kiosk. Every key request carries the encoder the link is bound to, so a mismatched link prints the guest’s key on the other machine
Q: Are transportation offers shown on the kiosk?
A: No. Airport and taxi offer steps are always skipped on the kiosk, since the guest has already arrived. They continue to run in the mobile online check-in.
Q: Can I hide the payment step from the kiosk and keep it in online check-in?
A: Yes. The kiosk capability toggles are separate. A step you exclude from the kiosk is skipped there even if it is mandatory in your online check-in flow.
Q: Can I enable a kiosk capability that is turned off in online check-in?
A: No. The kiosk toggle stays off and disabled until the underlying service is enabled in your Online Check-In settings.
Q: If I hide the arrival time page, what arrival time is recorded?
A: The current hour at the property, and never earlier than your minimum check-in time. Arrival method is left unset because the guest never chose one.
Q: What happens if the room is not ready?
A: The guest sees the Room Not Ready screen with the reservation number, your configured message, and a Done button. No key is issued at that point. On the kiosk, this screen appears whenever the reservation is not yet checked in on the PMS, which is normally what a room that is not ready looks like.
Q: What happens if key printing fails?
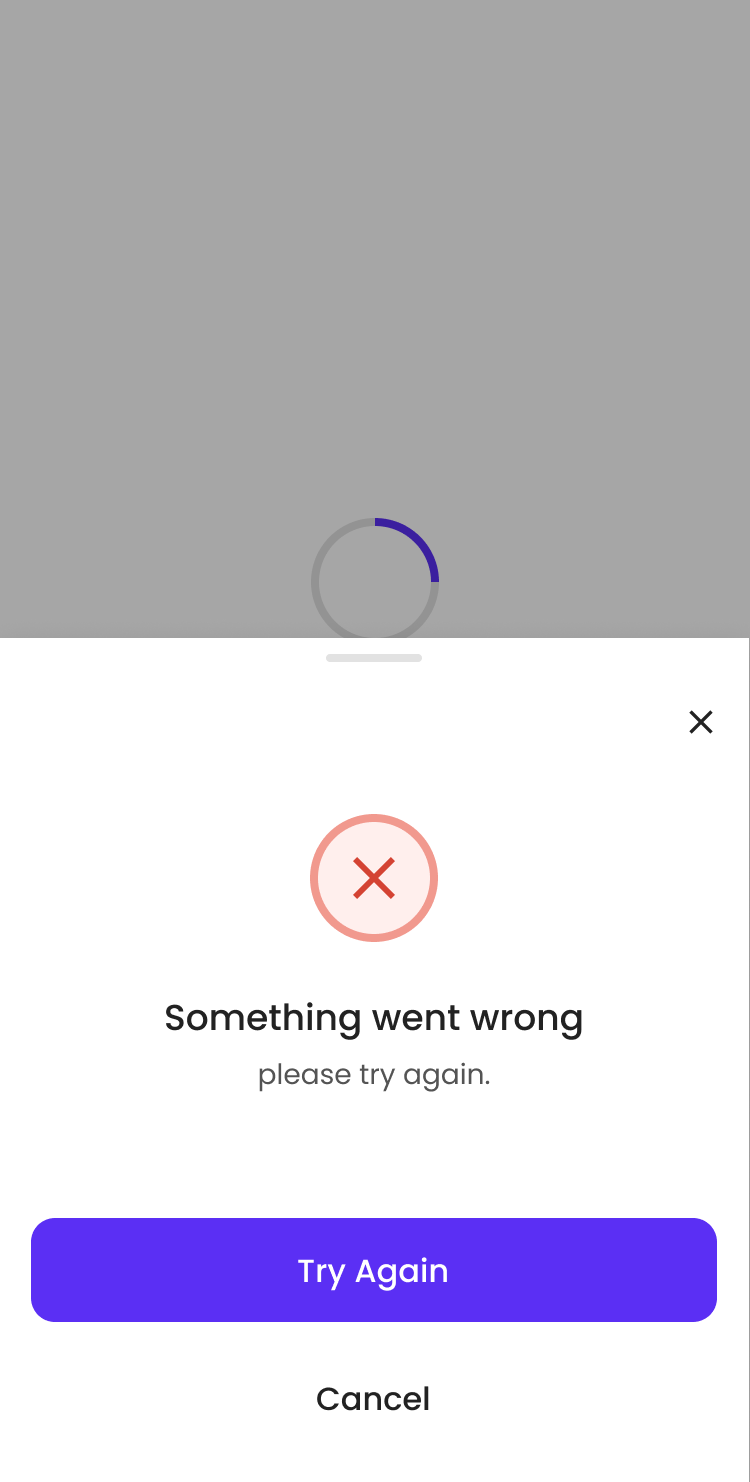
A: The kiosk shows a "Something went wrong" pop-up with a Try again button. If it keeps failing, direct the guest to reception and check the encoder and the integration.
Q: Can a guest print more than one key?
A: Yes. The Print additional key option is available on the key ready pop-up, and Get another key is on the Key Management screen.
Q: What happens when a guest replaces a lost key?
A: A warning pop-up explains that the current keys will be deactivated. On confirmation, the old keys are invalidated, and a new key is printed.
Q: Does the reservation status update automatically?
A: Only if you switch on Update reservation status in PMS after check-in and pick a status. Otherwise, the kiosk leaves the status alone. Your PMS can still refuse the change, for example, while the room is not clean or no room is assigned. Your PMS can still refuse the change, for example, while the room is not clean or no room is assigned.
Q: What does the QR code on the final screen do?
A: It opens the Guest App for that reservation on the guest's phone, so they have their stay information after check-in. Arrivals through it are attributed to the kiosk.
Q: How long does the kiosk stay on the final screen?
A: The Done button counts down from 30 seconds and then returns the device to the Welcome screen. The guest can tap Done to return immediately.
Q: What happened to Digital Spots?
A: It was renamed QR Codes and moved into the On-Site Experience settings area, next to the Self-Service Kiosk page. Existing Digital Spots links still resolve to the new location.
Q: Can I configure the kiosk per brand?
A: Yes. Switch on Override options on the brand’s Self-Service Kiosk page. Until then the brand inherits the account’s kiosk settings. Key hardware stays connected at account level.
Q: Can the front desk still assist a guest?
A: Yes. Staff can take over at any point, and the same boot screen serves the Staff-Assisted (Control Device) experience for front desk devices. That mode is staff-operated, so it does not use the unattended kiosk controls.
Q: Can guests check out at the kiosk?
A: Not yet. Check Out appears in the settings as Coming Soon.
Comments
0 comments
Article is closed for comments.