
Overview
- Scan-first auto-population. Document scanning moves to the beginning of the Basic Details step, and the extracted data pre-fills the form.
- Broader document support. Duve previously validated passports only, via MRZ. You can now also accept and validate national IDs and driver's licenses.
PMS sync through Field Match. Autofilled answers write to your PMS for every question with a PMS Field Match set. Which fields sync, and under which conditions, depends on your PMS.
- Fewer fields to type means less drop-off on mobile, where most guests complete check-in.
- Extracted data matches the document exactly, so there are no typos or mismatches for your front desk to reconcile on arrival.
- Cleaner identity data supports regulatory reporting submissions in markets that require them.
- Correct data lands in your PMS without anyone re-keying it at the desk.
| Applies to: All Duve accounts using Online Check-In, including hosts who do not currently require a document upload. The guest-facing scan entry point appears in the OCI wizard on both mobile and desktop. |
Use cases
- Scan your passport instead of typing your details, so you can finish check-in faster on your phone.
- Review and correct the pre-filled fields, so you can make sure your details are right before you submit.
- Skip the scan and type manually, so you can complete check-in without scanning anything.
- Turn the scan entry point on per property, so you can offer a faster, scan-first check-in experience.
- Receive accurate, pre-populated guest identity data, so you can cut down on arrival-day corrections and check-in delays.
- Map your Basic Details questions to PMS Field Match values, so scanned data flows straight into your PMS.
Before you start
- Decide which document types you will accept. At least one type must be selected.
- If you use regulatory reporting, confirm that the document types you accept meet your local authority's requirements.
- Connect your PMS (recommended). Answers sync only for questions that have a PMS Field Match set. Without a connected PMS, the scan still fills the form, but nothing is written to your PMS.
- Check your brand-level settings. The OCR toggle can be overridden at brand level, so a property setting may not be the one in effect.
- Review your Basic Details questions. Each question needs the right page, answer type, and Field Match before it will autofill. See how autofill works.
How to set it up
1. Choose which documents you accept
- Passport
- National ID
- Driver's License
Setup note: With ID Document verification switched off, any document is accepted and no type check runs.
2. Turn on the OCR scan entry point
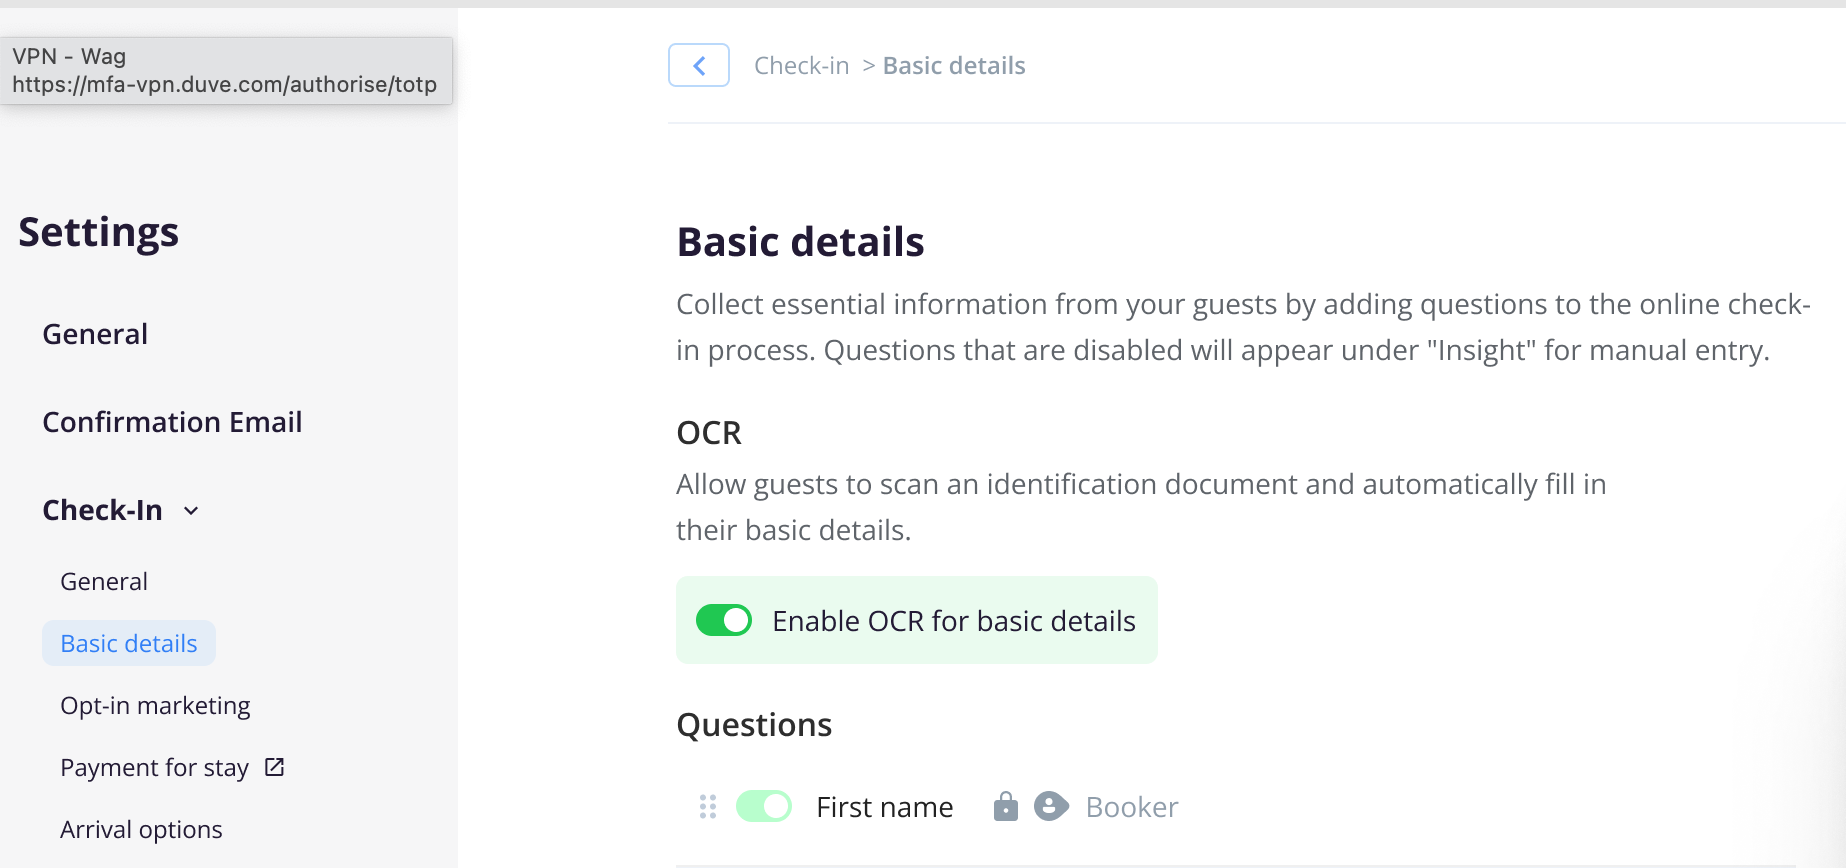
- On: guests see the Scan ID entry point at the top of the Basic Details step.
- Off: the OCI flow behaves exactly as it did before. Guests fill in the Basic Details form first, then upload their document in the Required Documents step.
- Hosts who already require a document scan: enabled by default.
- Hosts who do not require documents: disabled by default.
Setup note: Brands can override this toggle. If a property's setting does not appear to take effect, check the brand level.
3. Set who needs to scan
4. Configure each question so it can autofill
The OCR toggle makes the scan appear. It does not, on its own, make any question fill in. Open each Basic Details question you want autofilled and set it up as described in the next two sections. Questions that are disabled appear under Insight for manual entry instead.
How autofill works
The guest scans their ID, and matching Basic Details questions fill in automatically. Existing answers are replaced only after the guest confirms. If the guest then scans a different document, any field that document does not carry is reset to its PMS value.
Four settings on each question decide whether and how it autofills. Find them in Settings > Check-In > Basic Details, then open the question you want to set up.
PMS Field Match is the one that matters most. A question is just a box on a form. Duve has no way of knowing that "Date of birth" on your check-in page is the same thing as the birth date printed on a passport. Field Match is what tells it. When you set Field Match > Field name to Birth Date, you are declaring that this question represents that piece of the document, and from then on the scan knows where to put the value and your PMS knows what it is receiving. Without it, the scan reads the birth date correctly and then has nowhere to put it: the question stays empty, and nothing is sent to your PMS. This is the single most common reason a working scan appears to do nothing.
Three other settings have to agree with it. The question must sit on the Personal Details (Basic details) page, since autofill only touches questions on that page. Its answer type must be able to hold the kind of value being written (a date needs the Date answer type, a document number needs Free text), and a mismatch makes autofill skip the question even when Field Match is set correctly. And for dropdown questions, the answer options source has to match the data: country questions need List of countries, while Gender and Type Of Document match on the option's Code.
All four live in the question's edit panel, and the question itself must be enabled.
Custom questions can autofill too, but only when the host configures them to display on the Basic Details screen.
The golden rule: answer type must match the data
Autofill skips a question whose answer type cannot hold the scanned value, even when the Field Match is correct. The classic failure is a date stored as free text.
| Data type | Allowed answer type(s) |
|---|---|
| Dates (birth, issue, expiry) | Date only |
| Text values (document numbers, support number) | Free text only |
| Countries (nationality, issuing, residence) | Free text, or Multiple choice > List of countries |
| Gender | Free text, or Multiple choice > Enter items manually (matching Code) |
| Type of document | Free text, Multiple choice > List of documents, or Multiple choice > Enter items manually (matching Code) |
Name fields: the exception
First Name and Last Name fill automatically from any scan, for every document type, with no Field Match needed. The only requirement is that guest name editing is not locked for the reservation. Every other field below requires a Field Match.
Field-by-field setup
1. Dates
Answer type: Date. Then set Field Match > Field name:
| Field Match | Fills with |
|---|---|
| Birth Date | Date of birth |
| Date Of Issue | Document issue date |
| Expiration date | Document expiry date |
Issue date is read from the text printed on the document, not from the MRZ. Passports often do not print one, so Date Of Issue may stay empty for passports even when it is set up correctly.
2. Type of document
Field Match > Field name = Type of Document.
| Answer type | Behavior |
|---|---|
| Free text | Writes the document name: Passport, National ID, or Driver's License (please see note below). |
| Multiple choice > List of documents | Built-in Passport / National ID / Driver's License. The matching option is selected automatically. |
| Multiple choice > Enter items manually | Fills only if an option's Code is recognized. |
Troubleshooting note: Recognize text (case-sensitive):
- Passport:
PASSPORT,Passport, orpassport - National ID:
IDENTITY_CARDoridentityCard - Driver's license: cannot be set with a manual Code. Use List of documents or Free text.
3. Document numbers
Answer type: Free text.
| Field Match | Fills with |
|---|---|
| ID / Passport | Any scanned document number |
| National ID number/DNI | National/local ID card number only |
| ID Support Number | Support / personal number on some national IDs, e.g. Spanish DNI |
ID / Passport catches every document number, so a single mapped question captures the number whatever the guest scans. If you also want the national ID number in its own field, add National ID number/DNI. The number is written to both.
4. Country fields
Answer type: Free text writes the country's English name. Multiple choice > List of countries is recommended. A manually built country list will not autofill.
| Field Match | Fills with |
|---|---|
| Nationality | Holder's nationality |
| Issuing State | Issuing country/authority |
| Issued Place | Same issuing country value |
| Document Issue Country | Same issuing country value |
| Country of residence | Holder's residence (UAE Emirates ID only) |
Issuing State, Issued Place, and Document Issue Country all receive the same issuing-country value. Set up the one your PMS uses. Country of residence is not printed on most IDs, so today only the UAE Emirates ID fills it; for all other documents, the guest completes it manually.
5. Gender
Field Match > Field name = Gender.
| Answer type | Behavior |
|---|---|
| Free text | Writes "male" or "female" (please see note below). |
| Multiple choice > Enter items manually | Fills the option whose Code matches the scanned sex. |
Troubleshooting note: Recognize text (case-sensitive):
For male:
Male,male,m,MFor female:
Female,female,f,FA document read as "X" (unspecified) is not autofilled, and other dropdown types will not autofill gender
PMS sync and Field Match
The Field Match list depends on your PMS
When you open a question's PMS Field Match section, you will see one of the following:
- Full list: your PMS accepts every field, for example, DuveConnect.
- Partial list: only the fields your PMS accepts are shown.
- "Field Match isn't supported for your connected PMS." The scan still fills the question, but the answer is not sent to your PMS.
- "Connect a PMS to sync guest answers with Field Match." No PMS is connected. The scan still fills the question, and answers start syncing once you connect a PMS.
How each PMS behaves
Support varies by PMS and by field, and several PMSs only write document data when a related field is also filled.
How guests use it
-
Guest reaches the Basic Details step. A Scan ID entry point appears at the top of the form.
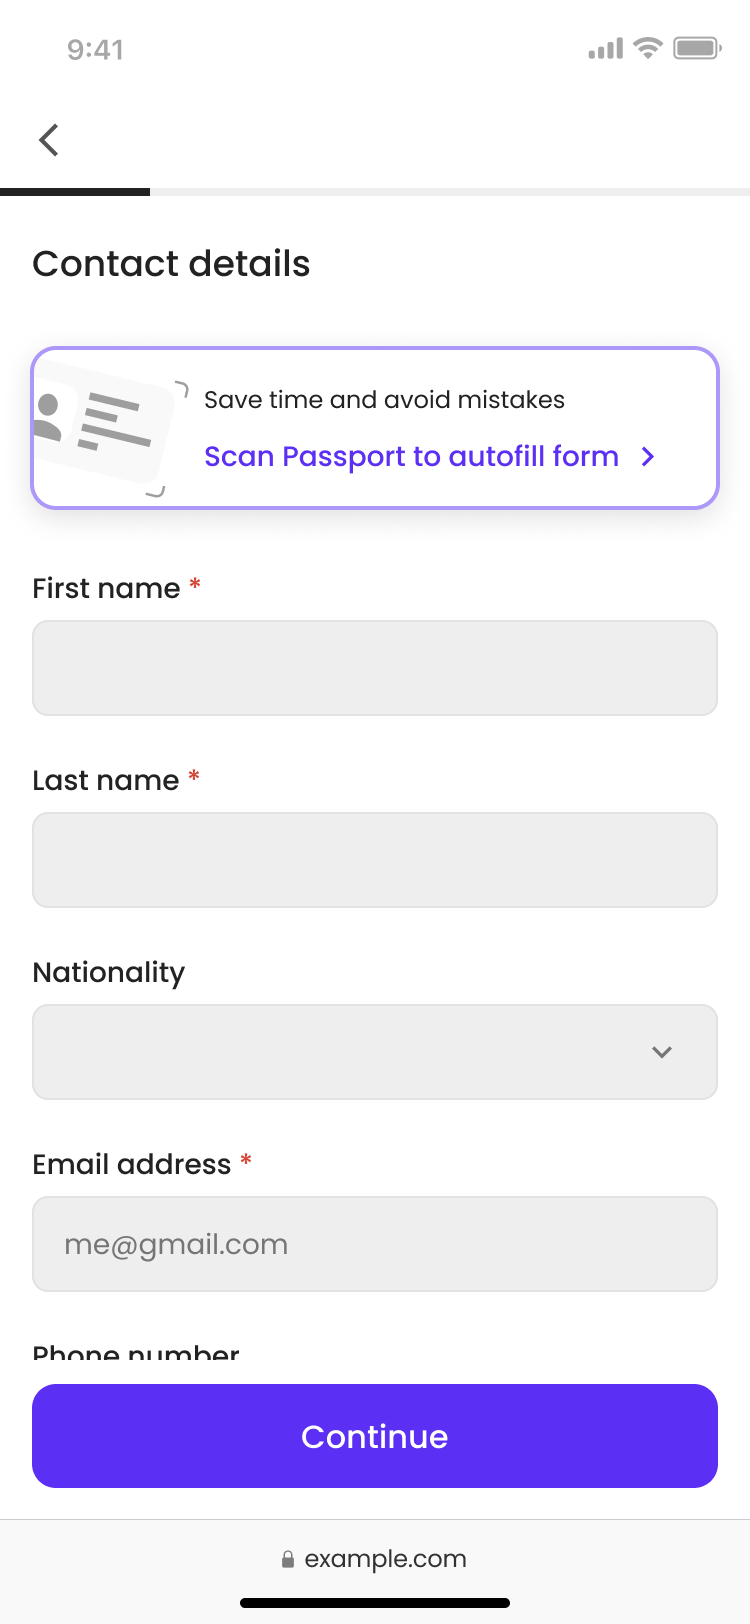
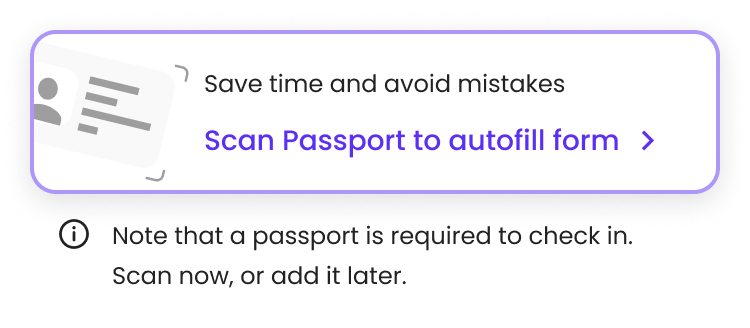
- If a passport scan is mandatory for your property, a note explains this.
- Guest taps Scan ID. A drawer opens with the camera and photo upload options.
- Guest photographs or uploads the document. A scanning animation runs over the preview while Duve reads the document.
-
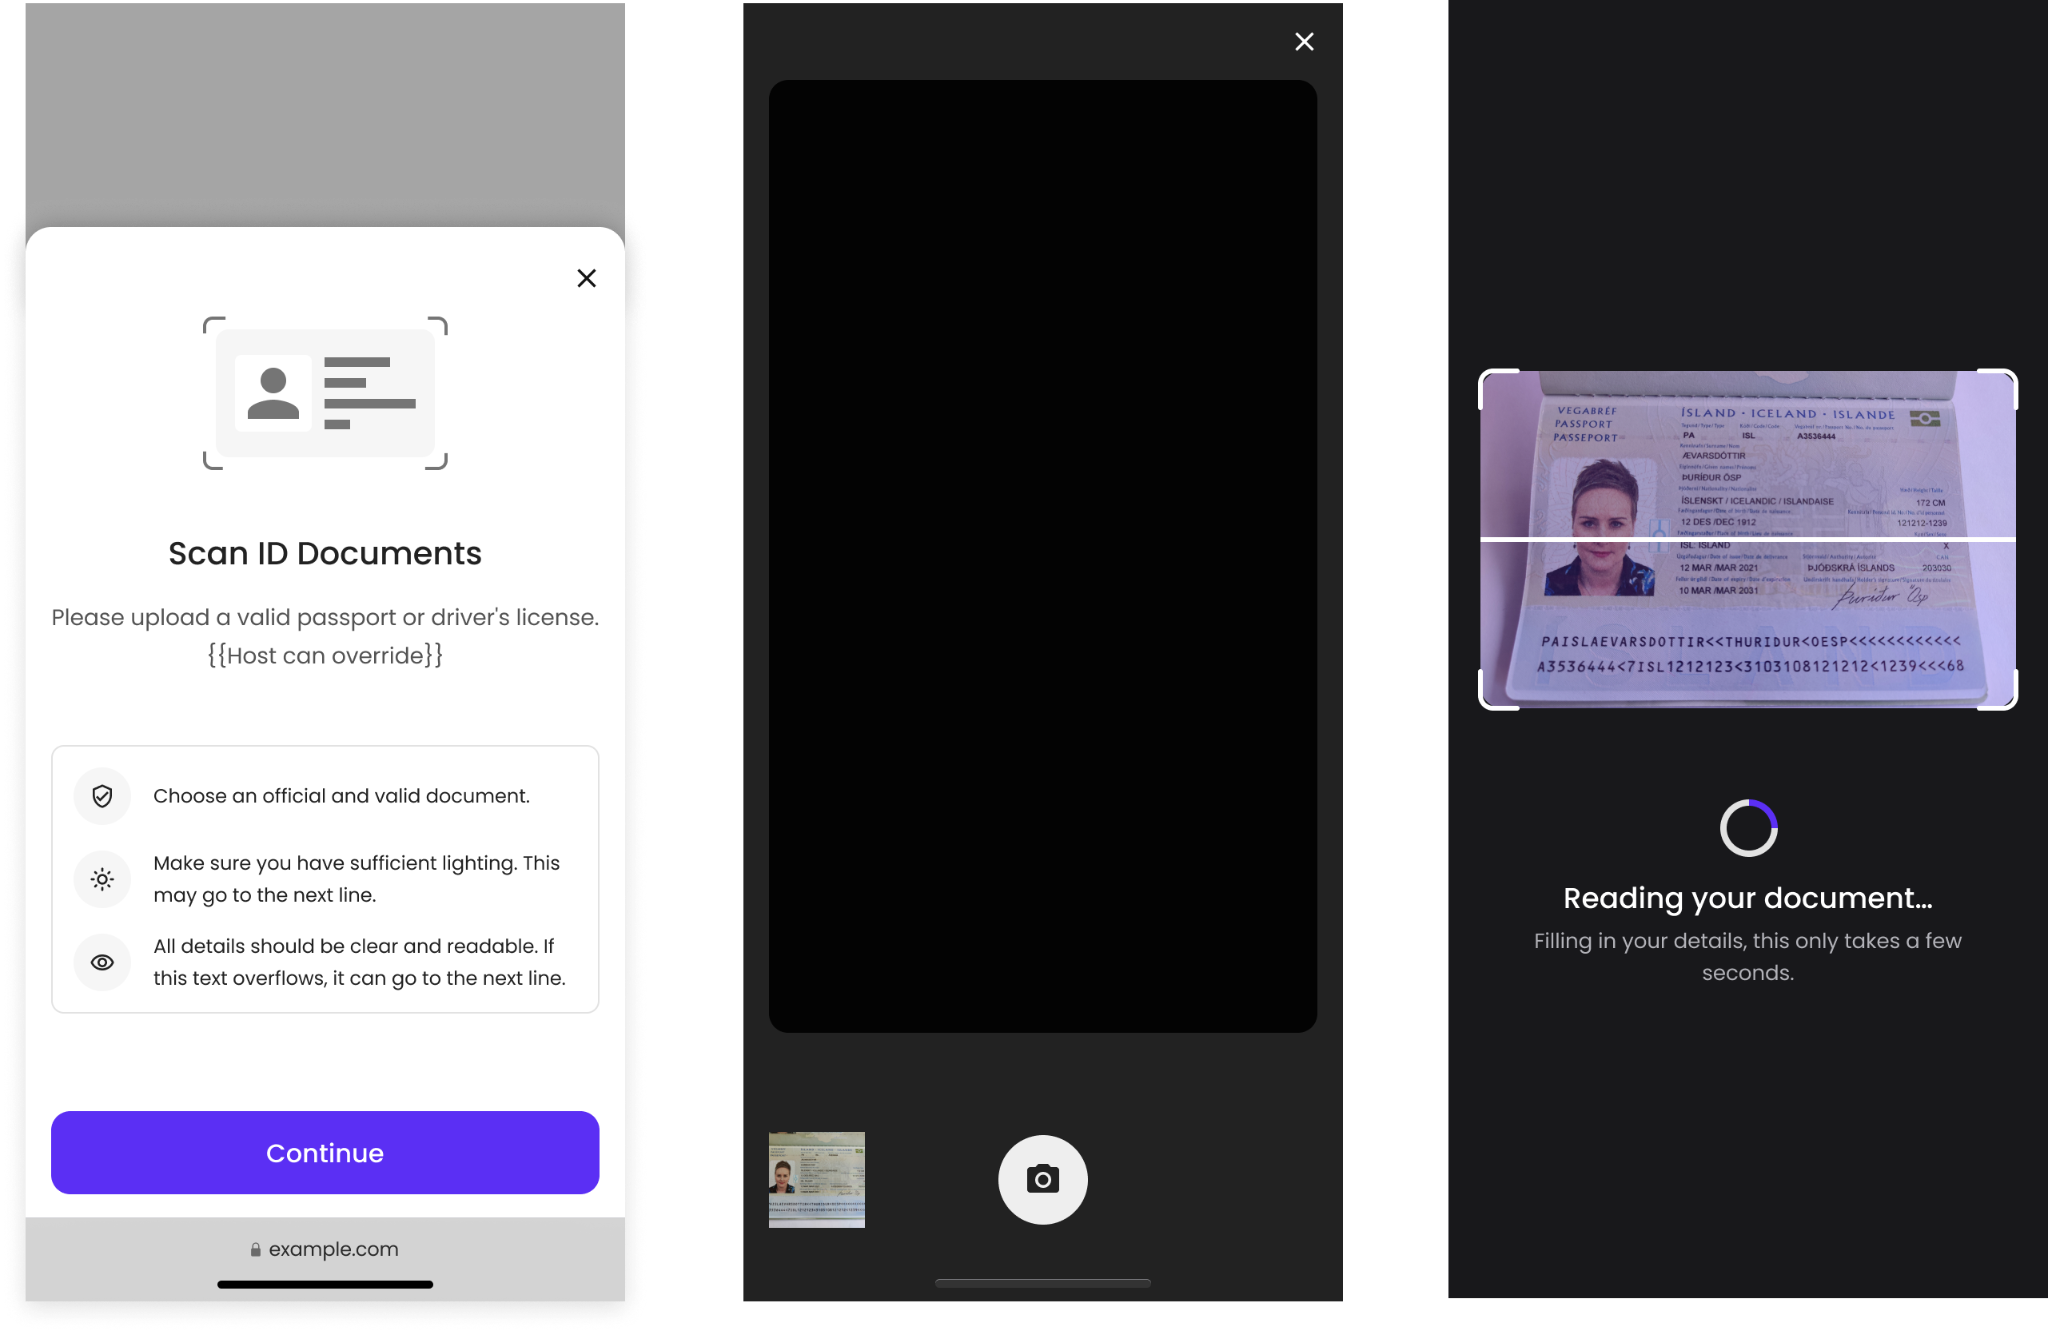
Guest lands back on the Basic Details form.
- On success:
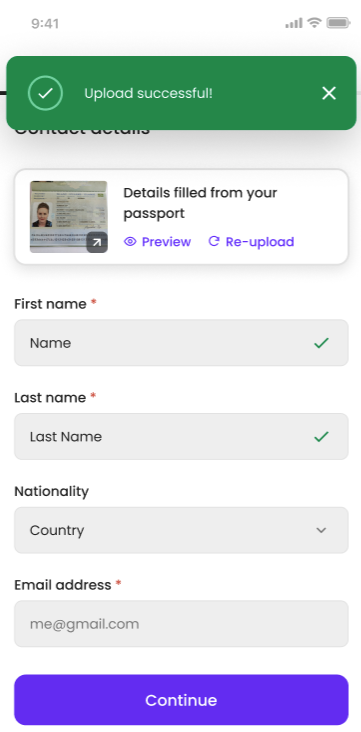
- A confirmation message appears, along with a thumbnail preview of the scan (The thumbnail stays visible as the guest moves back and forth through the wizard), and two actions:
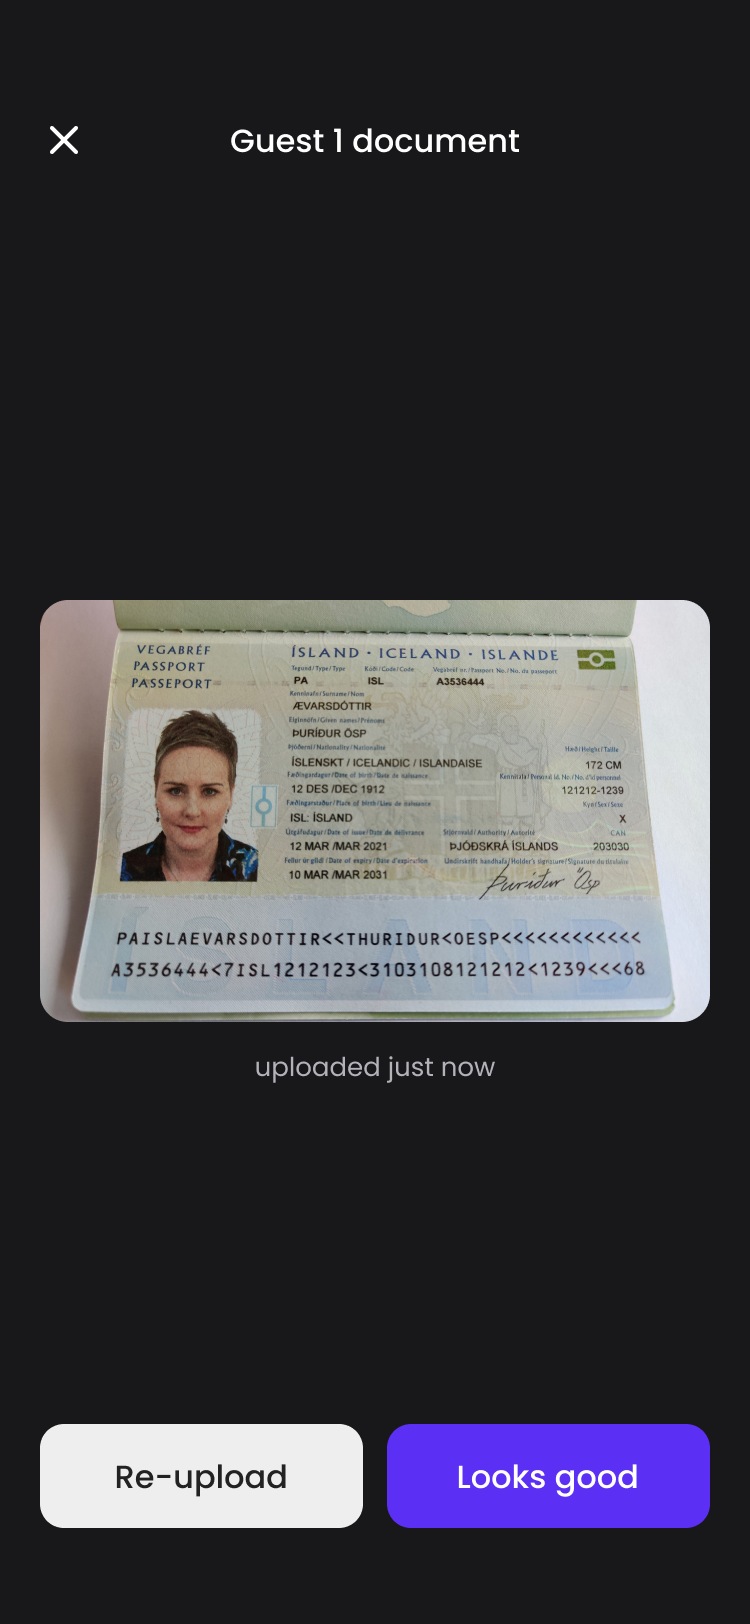
- Preview opens the image so the guest can approve it or re-upload.
- Re-upload resets the flow and starts a new scan.
-
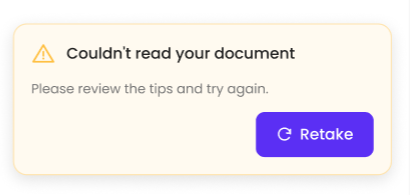
On failure:
- An error message, Couldn't read your document, appears when the documentation cannot be read and includes a Retake button, which restarts the photo or upload flow.
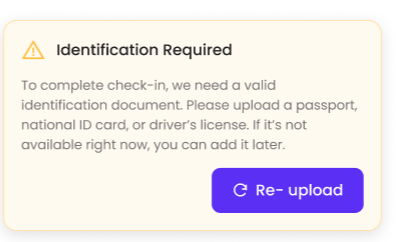
- An error message Identification Required appears when the documentation cannot be read and includes a Re-upload button, which restarts the upload flow.
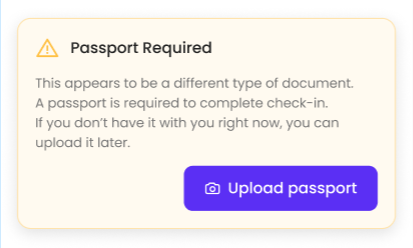
- An error message Passport Required appears when the documentation cannot be read and includes an Upload passport button, which restarts the upload flow.
- Guest reviews the pre-filled fields, completes anything left blank, and continues.
- Guest skips the document step later. Anyone who completes the scan successfully on Basic Details will not be asked to upload the document again in the Required Documents step.
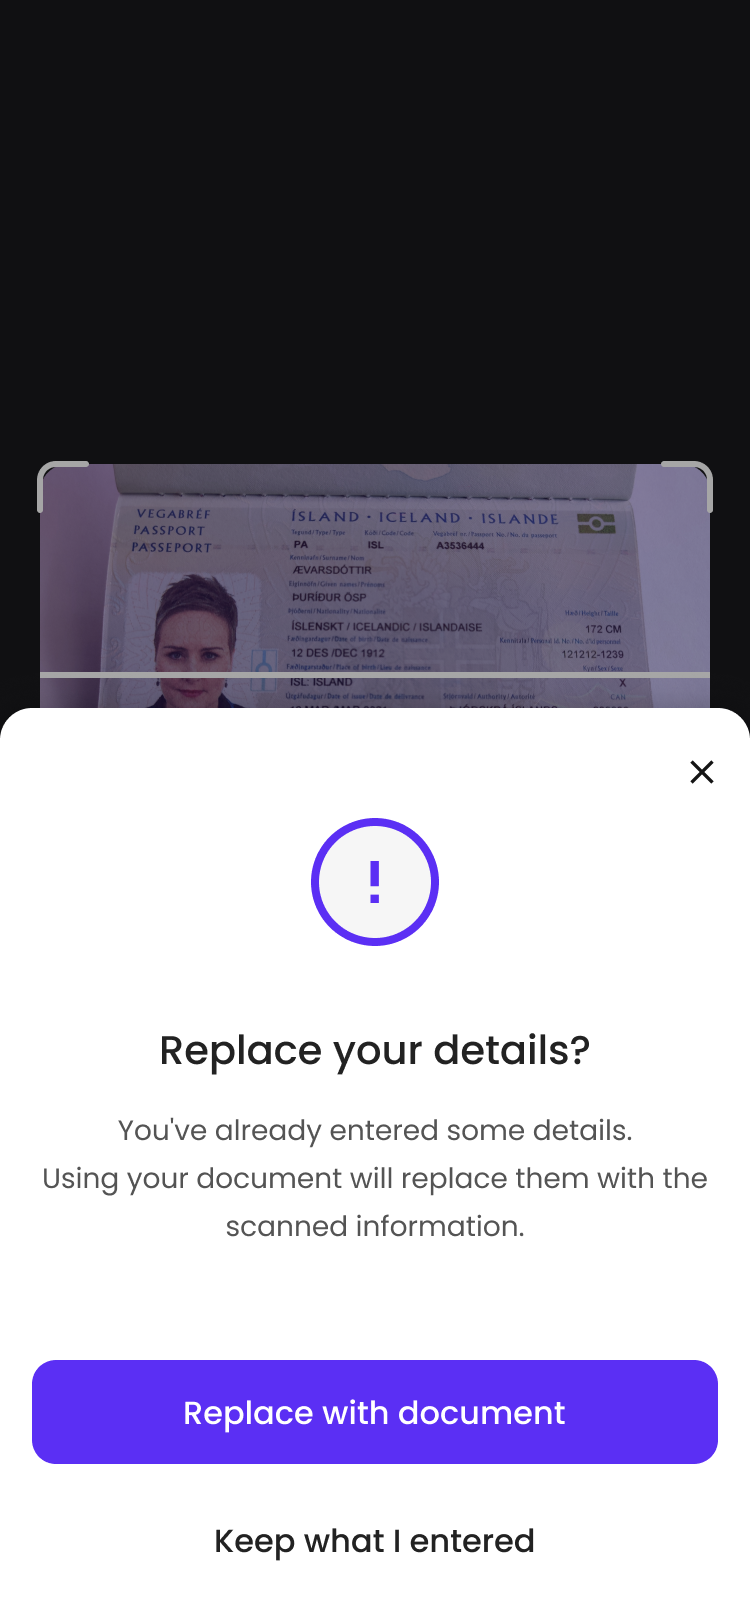
If the guest already typed their details before scanning
- Replace with document overwrites the fields with the scanned values.
- Keep what I entered leaves everything the guest already typed untouched.
Multi-guest flow
- Each guest who needs a document gets their own scan entry point. If you require documents for more than the primary guest, the Scan ID entry point appears for every guest who needs one, on their own section of the form.
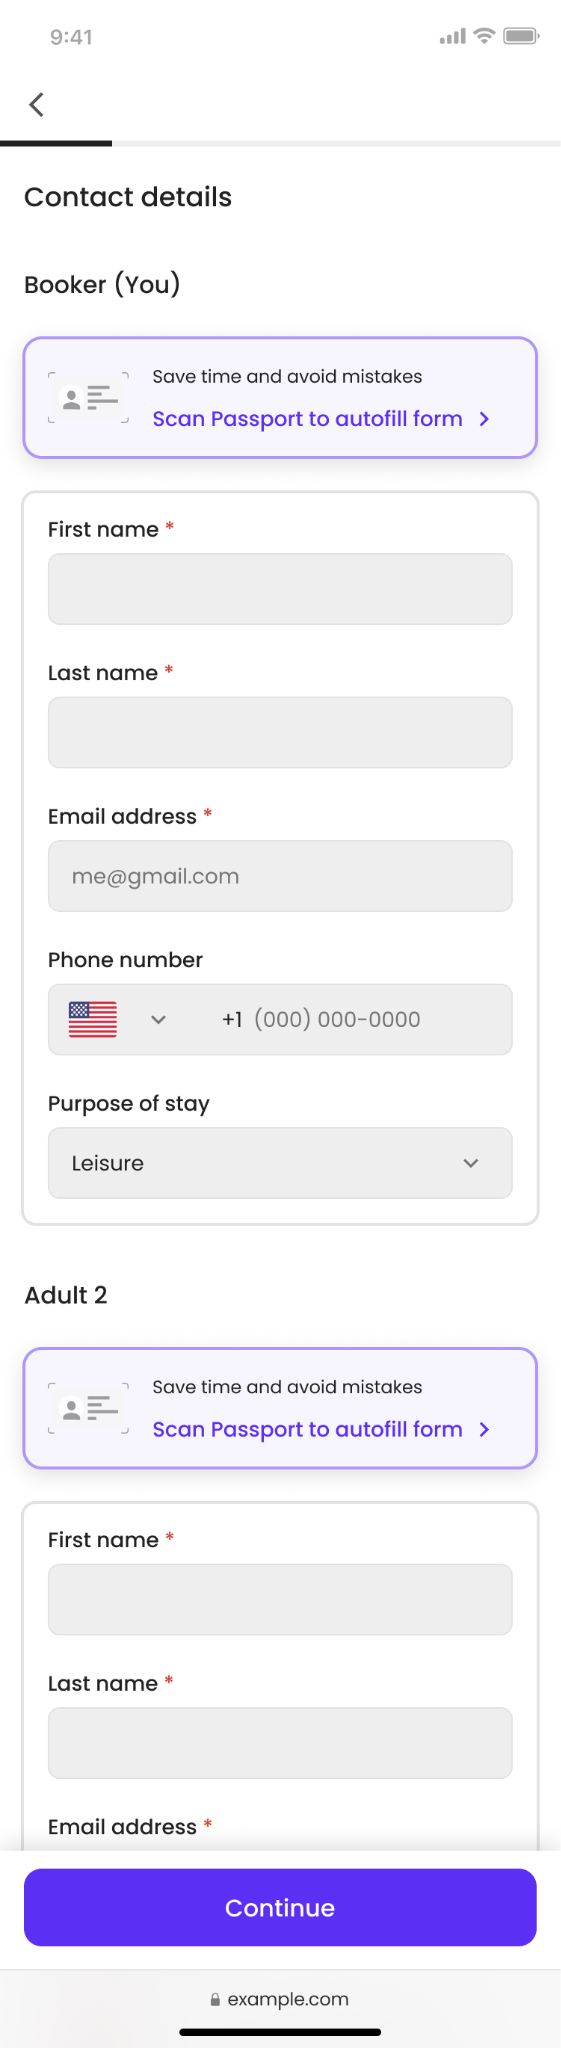
- A successful scan means no second upload. Any guest who completes the document scan on the Basic Details step will not be asked for their document again later in the Required Documents step.
Which fields get filled in
- First name
- Last name
- Date of birth
- Nationality
- Document number (passport, national ID, or license)
- Document expiry date
- Date of issue
- Sex/Gender
- Issuing country
- Country of residence - UAE only
- Type of document
-
When Check-In > Extra Customization > Prevent guest from editing his personal info is enabled, the guest's personal detail fields are locked in the check-in flow, and scanned document (OCR) data does not update them. The document is still uploaded and stored, but the values it reads are not written into the locked fields.
Troubleshooting
-
Symptom: "We couldn't read your document" error: The image was too blurry, dark, cropped, or angled for Duve to read the MRZ or run OCR.
- Solution: Tap Retake. Lay the document flat on a plain surface, in good, even light, with all four corners in frame and no glare.
-
Symptom: "Identification Required" error: the document could not be validated, or it is expired or damaged.
- Solution: Tap Re-upload and try a different document, or skip the scan and enter details manually.
-
Symptom: "Passport required" error: the uploaded document is not the type your property accepts.
- Solution: Upload the document type requested, or contact the property if the guest does not have one.
-
Symptom: Some fields are still empty after a successful scan: Those values were extracted with low confidence, so Duve left them blank on purpose.
- Solution: The guest fills them in manually. This is expected behavior, not a failure.
-
Symptom: Names came back slightly different from the booking: the document is the source of truth for extracted names.
- Solution: The guest can edit the fields, unless your property prevents guests from editing personal info.
Restrictions and limitations
- No PMS sync. Validated document data is not pushed to guest or reservation records in your PMS in this version.
- Not a fraud prevention tool. This feature extracts and validates document data. It does not perform full identity verification, biometric matching, or liveness detection.
-
Three document types only. Passport, national ID, and driver's license. Other documents such as residence permits or visas are not supported for extraction.
-
Supported documents
- Passport (with MRZ) → fills all fields
- National ID (MRZ) → EU countries + UAE Emirates
- Driver's license → USA, EU, UK, Israel, Singapore
- Singapore NRIC → supported
-
Supported documents
- Manual entry cannot be removed. The scan is a convenience, not a gate. There is no setting that forces a guest to scan before typing.
- Guest form editing rules still apply. If you have enabled Check-In > Extra Customization > Prevent guest from editing personal info, guests will not be able to change locked fields, including those pre-filled from a scan.
- No changes to retention or privacy policies. Document retention and privacy handling are unchanged by this feature.
- When "Require document" is mandatory, guests can skip the scan in the "Basic details" section. If they scan at the beginning, they won't be asked again.
Tips and tricks
- Keep the document types you accept narrow. Only select types your team can actually work with, so guests are not offered an option that fails validation.
- Advise guests to use the back camera. Rear cameras produce a much sharper image than front cameras, and image quality is the main reason scans fail.
FAQs
Related articles:
MRZ Verification for Required Documents in the Online Check-in
Setup Document Verification and Guest Experience for Dubai Hosts
Comments
0 comments
Article is closed for comments.